

Access to clean, refreshing water is a fundamental requirement for a healthy home. While many municipal water systems meet basic safety standards, the journey from the treatment plant to your kitchen tap can introduce sediment, chlorine tastes, and lead from aging pipes. An under-sink water filtration system is the most efficient and space-saving solution to ensure every glass of water you pour is of the highest quality.
At AMWater Filter, we specialize in providing high-performance filtration solutions that are as easy to maintain as they are effective. Whether you are a seasoned DIY enthusiast or a first-time homeowner, installing an under-sink system is a manageable project that yields immediate benefits.
In this guide, we will walk you through the entire installation process, from choosing the right tools to the final leak check, ensuring you have the confidence to upgrade your kitchen’s water quality today.

Why Choose an Under-Sink Filtration System?
Before we dive into the installation steps, it is important to understand the advantages of this specific setup. Unlike pitcher filters that take up fridge space and require constant refilling, under-sink systems are integrated directly into your plumbing.
1. High Flow Rate and Convenience
Under-sink systems provide a steady stream of filtered water on demand. You don't have to wait for a reservoir to drip through a small filter; the water is ready as soon as you turn the handle.
2. Superior Contaminant Removal
Because these systems use larger, more robust cartridges, they can utilize advanced filtration media like carbon blocks and KDF. These are far more effective at removing heavy metals and VOCs than the gravity-fed filters found in pitchers.
3. Space-Saving Design
By housing the filtration unit beneath the cabinet, you keep your countertops clutter-free. This is essential for modern, minimalist kitchens where workspace is at a premium.
Preparation: Tools and Materials You Will Need
To ensure a smooth installation, gather all your supplies before you begin. Most modern kits, including those from AMWater Filter, are designed for tool-free or minimal-tool assembly.
Essential Tools:
• Adjustable wrench
• Phillips and flat-head screwdrivers
• Plastic tubing cutter (or a sharp utility knife)
• A small bucket or towel (to catch residual water)
• A flashlight or headlamp
Materials:
• Your new under-sink filtration kit
• Mounting screws (usually included)
• AMWater Filter for Sink Faucet (if you prefer a multi-point filtration setup)
• Teflon tape (optional, but recommended for threaded connections)
Step-by-Step Installation Guide
Step 1: Clear the Workspace and Shut Off the Water
The space under a kitchen sink is often crowded with cleaning supplies. Clear everything out so you have room to move. Next, locate the cold water shut-off valve—usually a small silver handle on the right side of the cabinet. Turn it clockwise until it stops.
Pro Tip: Turn on the kitchen faucet's cold water handle to release any remaining pressure in the line and confirm the water is fully off.
2. Disconnect the Cold Water Line
Place your bucket under the shut-off valve. Using your adjustable wrench, loosen the nut connecting the flexible faucet riser hose to the shut-off valve. Be prepared for a small amount of water to drain out of the hose.
3. Install the Feed Water Adapter
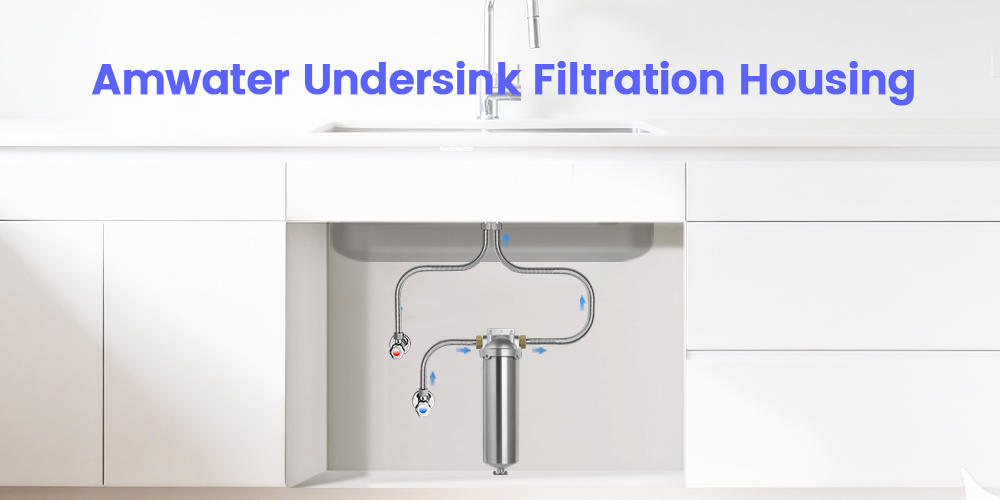
Most under-sink kits include a T-adapter (also known as a feed water adapter). This allows you to divert a portion of the water to the filter while still supplying the main faucet.
• Wrap a small amount of Teflon tape around the threads of the shut-off valve.
• Screw the T-adapter onto the valve and tighten it with your wrench.
• Reconnect the main faucet riser hose to one side of the T-adapter.
4. Mount the Filter Housing
Decide where you want the filter to sit. Most people prefer to mount it on the side wall of the cabinet to keep the floor area clear for storage.
• Hold the bracket against the wall and mark the screw holes.
• Ensure there is at least 4 to 6 inches of clearance below the housing so you have room to unscrew the canisters during future filter changes.
• Drive the screws into the cabinet wall and hang the filtration unit.
5. Install the Dedicated Faucet (Optional)
Many systems come with a separate, slim drinking water faucet. This requires drilling a hole in your sink or countertop.
• If you have an existing hole (like for a soap dispenser), you can use that.
• If not, you will need to drill a hole using a hole saw or stepped drill bit.
• Slide the faucet through the hole and secure it from underneath with the provided nut and washer.
The Alternative Solution: If you do not want to drill a hole in your countertop, you can pair your system with the AMWater Filter for Sink Faucet. This allows you to have filtered water directly from your main tap without the need for a secondary faucet, providing a much cleaner and faster installation process for renters or those with stone countertops.

6. Connect the Tubing
This is where the magic happens. Most modern systems use "Quick-Connect" or "Push-Fit" fittings.
• Inlet: Measure a piece of tubing to go from the T-adapter to the "Inlet" port on the filter. Cut it squarely and push it firmly into the fitting until it seats.
• Outlet: Run a second tube from the "Outlet" port on the filter to either your dedicated drinking faucet or back into your main faucet line (if using a bypass-style system).
7. Final Check and System Flush
Once all connections are tight:
• Ensure the filter cartridges are properly seated in their housings.
• Slowly turn the cold water shut-off valve back on.
• Watch the connections closely for any drips. If you see a leak, tighten the nut slightly or re-seat the quick-connect tubing.
• Turn on the filtered water faucet and let the water run for 5 to 10 minutes. This flushes out any carbon fines or air pockets from the new filters.
Maintenance and Troubleshooting
An under-sink filter is a low-maintenance device, but it is not "set it and forget it." To maintain the highest water quality, follow these tips:
• Change Filters Regularly: Most cartridges need replacement every 6 to 12 months. If you notice a drop in water pressure or a change in taste, it is time for a fresh set.
• Sanitize the Housing: When you change the filters, take a moment to wash the inside of the housing with warm, soapy water to prevent any bacterial buildup.
• Check for Leaks Quarterly: Once a season, take a quick peek under the sink with a flashlight to ensure all fittings are dry and secure.
Why Quality Hardware Matters
When you are dealing with pressurized water lines inside your home, the quality of the materials is paramount. Cheap plastic fittings are prone to cracking over time, which can lead to catastrophic water damage.
At AMWater Filter, we prioritize durable materials and precision engineering. Our systems are designed to withstand the fluctuations in municipal water pressure, and our Water Filter for Sink Faucet is built with high-quality finishes that match your existing kitchen hardware perfectly. By choosing professional-grade equipment, you are not just buying a filter; you are buying peace of mind for your home's infrastructure.
Conclusion
Installing an under-sink water filter is a rewarding Saturday afternoon project that provides long-term health benefits for your entire family. It eliminates the need for plastic water bottles, saves you money in the long run, and ensures that the water you use for cooking, coffee, and drinking is as pure as possible.
Whether you choose a full under-sink system or a convenient AMWater Filter for Sink Faucet, the key is to take that first step toward better water today.
Ready to start your journey to pure water? Visit AMWater Filter to explore our full range of filtration solutions and find the perfect system for your kitchen.

Leave a comment
This site is protected by hCaptcha and the hCaptcha Privacy Policy and Terms of Service apply.